When you open a Working table and select Edit | Import | File, you will first be be prompted with a standard "Open File" dialog box to select one or more import files which can be in one of the following supported import file formats:
Paradox (.db), Access (.mdb), and dBase (.dbf) database tables
Excel (.xls) spreadsheets
ASCII text files (.txt, .csv) created by many different programs
USGS/NWIS text file (.rdb)
Binary modeling files (.bmd) used in EPA programs like WASP
Data Storage System files (.dss) used in Corps of Engineers programs like HEC-RAS and HEC-HMS
BASINS Watershed Data Management file (.wdm)
Alternatively, you can copy tab-delimited text (such as from an Excel spreadsheet) to the clipboard and select Edit | Paste/Import Records.
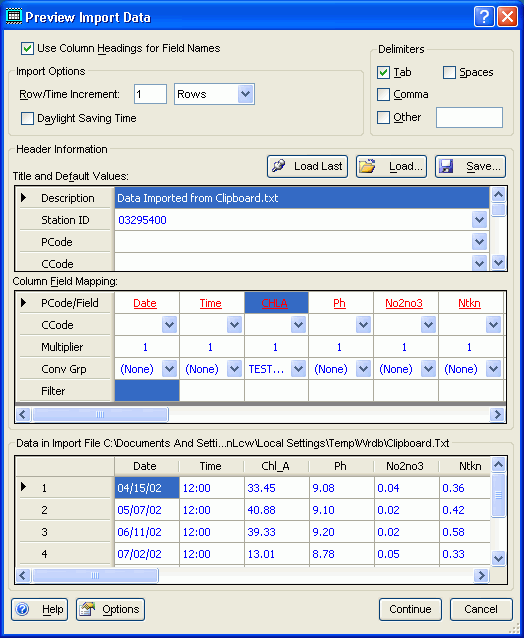
After you do so, the following form appears:

Here's what each part of the form is used for:
Use Column Headings for Field Names: When importing data from text files, this checkbox is enabled and indicates whether the first non-blank, non-commented line of the import file should be assumed to contain the column heading names; if so, the column heading appear in the preview grid but are not imported. For spreadsheets, data tables, DSS, WDM, and BMD files, the box is always checked and disabled.
Import Options: Enter the increment number to use for the time or row increment; if the increment type is set to "rows" then if you enter "1", that means that every row will be import; "2" means that every other row will be import. If the increment type is set to "minutes", then this is the minute number used for imports (e.g., 5 means to only import data collected at times evenly divisible by five minutes).
Delimiters: This identifies the delimiter used for text files; the first few lines of the file are read to guess the settings--you can override to indicate multiple delimiters such as tabs, commas, spaces, or a specified character. Note that space-delimited files are interpreted to mean that one or more spaces separate fields.
Load Last: This will load header information from your previous session (which is automatically saved to a temporary file).
Load Header: Click this to load header information from a previously-saved header (.HDR) file
Save Header: After specifying all the header information, click this to save all header information to a header (.HDR) file that can be reused
Title and Default Values: This grid contains a number of header fields that apply globally to the import file (unless overridden in the data file); these include:
Description: a text string describing the import operation and source of the data
Station ID: the station ID that will be assigned to all import records (unless a Station ID field is found in the import data)
PCode: the parameter code that will be assigned to all records (unless a PCode field is found in the import data)
CCode: the compositing code that will be assigned to all records (unless a CCode entry is made in the grid below or CCode field is found in the import data)
Agency: the agency code to assign to each record.
Month, Day, Year, Time: if no date-time data are in the import file, these entries will be used to form a global date-time value for all imported data
LEW_Pct & Depth_M: if not found in the import data, these will be assigned to all imported data records
Multiplier: this global multiplier will be combined with all other multipliers to adjust the RESULT field numeric values
Station & PCode Group: the station and/or PCode group that will be created or appended to for all stations and PCodes that are imported.
Column Field Names, CCodes, and Multipliers: This grid contains field names, CCodes, and multipliers to be used for each column/field in the import file/table
PCode/Field: this row contains either the parameter code to assign to all values in that column, or the WRDB field name associated with the column; click on the hyperlink to display the field mapping list:
(This is explained in more detail in Field Mapping)
CCode: the compositing code to assign to all values imported (ignored unless the column is a PCode or Result column)
Multiplier: the multiplier applied to all values imported (ignored unless the column is a PCode or Result column)
Conversion Group: this option relates to the automatic conversion of fields upon import. If RCodes are being imported as a separate column, then the 'Conv Group' column heading can be specified to use the ConvGrp Support table you've previously populated with named conversion groups. This Support table contains three fields: the first being the Group Name, then second the 'Convert From' value, and the third being the corresponding 'Convert To' value. If the imported value is found in that group's "Convert From" field (ignoring case), then the "Convert To" value is automatically substituted.
Filter: here you can enter a wildcard string which, if present, will control which data rows are imported. For example, if you enter "abcd", then only records having an exact match to that string will be imported (case is ignored, so "AbCd" matches). You can also include wildcard characters like ? and * to indicate single and multiple wildcard characters (e.g., "Do*" will match "DO" and "dODef") .
Data in Import File: This grid contains a preview of the first 1000 lines in the import file; if import file uses column headings for field names, they are shown as column headings in the grid (otherwise, A, B, C, etc. are shown); parsing of the input file is based on the currently selected delimiters--if the preview doesn't look correct, try adding or removing delimiters
Options: This opens a dialog that lets you select additional options for the import:
Validate Imported Data against Support Tables? This will compare imported values for Station ID, PCode, CCode, and RCode with values found in the appropriate Support tables. If not found, a warning will be issued and a new Support table entry will be made and you'll have to complete all other fields for the newly added records. In addition, all imported numeric Values (i.e., values imported under PCode column headings or the 'Result' column heading) will be compared with allowable ranges in the PCodes support table. Warnings will be issued if out of range values are found. This option will somewhat slow down the speed of import operations.
Conversion group for RCodes prepended to Results? This option relates to the automatic conversion of RCodes upon import. If RCodes are being imported as a separate column, then the 'Conv Group' column heading can be specified to use the ConvGrp Support table you've previously populated with named conversion groups (see above). However, the above procedure only works if RCode is being imported from a separate column. If the RCode is 'embedded' in the numeric Result field (like '<1.23') and you want to do the RCode conversion, select the appropriate group name; otherwise select '(None)'. This option is likely to have relatively little impact upon import speed.
Bypass all conversions and send to WRDB as-is. If the import file is already in a tab-delimited text file with column headings and the data fields in the exactly correct order and data type, you can bypass all conversions and directly import the data into WRDB. Refer to the documentation about the required fields for each table. The type of table being imported will be discerned from the field names in the import table.
Continue: When the preview form has been completed properly, click this button to start the import operation. If you have failed to specify adequate information, you will see this warning:

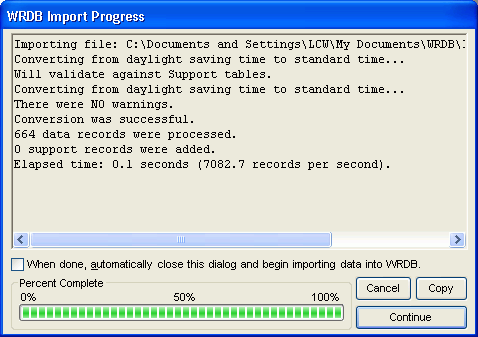
If all is in order, a progress form appears and you can watch as the data are imported:

The progress form includes the following items:
Progress Text: This displays progress messages, assumptions, and warning messages during the import operation. Carefully review these messsages before continuing with the import.
Auto-Import Checkbox: Sometimes import operations can take several minutes or even hours; you can check this box if you want the Working table update operation to automatically continue after the import is complete (there will be a 10 second pause to give you a chance to change your mind).
Progress Guage: This progress bar shows the percent complete of the import operation.
Cancel Button: Cancels the import operation.
Copy Button: Copy the contents of the textbox above to the clipboard.
Continue Button: After importing is complete, click this button to actually bring the data into your Working table.
After the import operation is complete, it can still take a considerable time to actually insert the imported records into your Working table.